Signs are simply blocks that allow the play to input text on one side. Typically, signs are used to display text, but due to the fact they are not a solid block they are also commonly used to block the follow of liquid to allow players to move back and forth without obstruction. Signs can also be used aesthetically to create the sides of chairs or bed ends.
How to Make a Sign in Minecraft (PC or Pocket Edition):
- First gather the necessary materials – You will need 6 wooden planks and one stick to build a sign inMinecraft.
- Craft Wooden Planks Out of Wood – One block of wood – after crafting – will turn into four wooden planks. To make a sign you will need at least 3 wooden planks.
- Craft Sticks out of Wooden Planks – Place two wooden planks together in a vertical line on the crafting table to yield 4 sticks.
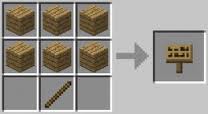
- Place a stick in the bottom middle of your workbench and place wooden planks as shown in the picture on the right:
- Place your sign. Upon placing you will be able to enter your text up to 60 characters.
Notes/Warning:
- When placing a sign underwater, an air bubble will disperse after placement. You can use this air to breathe underwater.
- You can place a sign on pretty much any block such as fences, glass, and other signs.
- Once a sign is complete the only way to edit it is to destroy the sign and start over.
- Understand that liquids cannot pass through a sign.
- Signs can be used for aesthetic purposes such as the back of a chair or arm rest, etc.
[youtube id=”sSVu2RGFCuQ” width=”600″ height=”350″]